Wednesday, 22 January 2014

Create an Enterprise Portal site

  1. In SharePoint Central Administration, under Application Management, click Create site collections.
  2. In the Web Application list, click Change Web Application, and then select SharePoint–80 or another Web application.
  3. Enter appropriate information in the Title and Description and Web Site Address sections.
    Important:You must enter a unique title and description for each Enterprise Portal site. If you create a new Web site by using SharePoint Services or IIS Manager, and the title or site description matches an existing site, Enterprise Portal cannot be deployed on the new site.

  1. If you downloaded and installed SharePoint language packs on the Web server the Select a language list is displayed in the Create Site Collection form. Select a language for this site.
  2. Under Select a template, click the Custom tab.
  3. Select the Microsoft Dynamics Enterprise Portal template.
  4. Enter information in the Site Collection Administrators and Quota sections, and then click OK.

RunBase in Ax

The RunBase framework provides a standardized approach to creating processes and batch jobs in Microsoft Dynamics AX.

The framework is implemented by the RunBase application class and supplies many features, which include the following:
  • Query
  • Dialog, with persistence of the last values entered by the user
  • Validate
  • Batch execution for users to schedule jobs. This functionality uses the RunBaseBatch class) and the pack and unpack methods with versioning.
  • Progress bar
  • Run
  • Client/server-optimized
Following are descriptions of some of the most important RunBase methods.
new Method

Always call super() in the new method.
The new method must not be too slow for your needs (it is periodically called for administrative purposes).
description Method

You must create a static description method that returns a class description—the class's role in the UI.
The description method must have the RunAs property set to Called or the equivalent behavior. If the class is defined as client or server, define the method as client server.
For example:
client server static ClassDescription description()
{
return "@SYS54106";
}
run Method

The RunBase.run method is the central method of the class. The job is done in the run method.
Skeleton:
void run()
{
    // Local declarations.
    try
    {
        this.progressInit
        ttsBegin;
        // Reset the variables that were changed in the transaction.
        ...
        // Do the job.
        while select forUpdate myTrans...
        {
            progress.incCount();
            progress.setText
            ...
            ...
        ttsCommit;
    }
    catch (Exception::Deadlock)
    {
        retry;
    }
}
pack and unpack Methods

For information about the pack and unpack methods, see the pack-unpack design pattern.
RunBaseReport.initQuery Method

Place code that modifies the RunBase query in the RunBaseReport.initQuery method. The RunBaseReport.initQueryRun method calls initQuery.
If the query in a RunbaseReport depends on values from the dialog, call this.initQueryRun after the data is moved from the fields to the variables.

Example

private boolean getFromDialog()
{
    ;
    perDate = dialogDate.value();
    this.initQueryRun();
    return super();
}
 
The initQueryRun method in the previous code calls initQuery.
private Query initQuery()
{
    query query = super();
    queryBuildRange qbr;
    ;
    qbr = query.dataSourceTable(
        tableNum(InventTrans)).findRange(
            fieldNum(InventTrans,DatePhysical));
    if (!qbr)
    {
        qbr = query.dataSourceTable(
            tableNum(InventTrans)).addRange(
                fieldNum(InventTrans,DatePhysical));
    }
    qbr.value(SySQuery::range(prevYr(PerDate),PerDate));
    qbr = query.dataSourceTable(
        tableNum(InventTrans)).findRange(
            fieldNum(InventTrans,DateFinancial));
    if (!qbr)
    {
        qbr = query.dataSourceTable(
            tableNum(InventTrans)).addRange(
                fieldNum(InventTrans,dateFinancial));
    }
    qbr.value(SysQuery::value(perDate+1) 
    + '..' + ',' + sysQuery::valueEmptyString());
    return query;
}

RunBase class: The RunBase class is a framework for classes that need a dialog for user interaction and that need the dialog values to be saved per user. The RunBase application framework runs or batches an operation. An operation is a unit of work, such as the posting of a sales order or calculation of a master schedule.The RunBase framework uses the Dialog framework to prompt a user for data input. It uses the SysLastValue framework to persist usage data and the Operation Progress framework to show operation progress.

class RunBase extends Object implements SysSaveable, SysRunable

RunBaseBatch class: All jobs that must be able to run in a batch must inherit from this class. The RunBaseBatch framework extends the RunBase framework, and X++ classes that extend this framework can have their operations enlisted in the batch queue.

class RunBaseBatch extends RunBase implements Batchable

RunBaseReport class: The RunBaseReport class makes all reports batchable and creates a standard dialog box. 

class RunBaseReport extends RunBaseBatch

This class is instantiated through the SysReportRun Class. It should be used by all reports. The purpose of the class is to: 

- Make all reports batchable 
- Create a standard dialog 

If you are creating more complex reports, it might be necessary to inherit from this class. If this is the case, you must create the following methods: 

lastValueElementName(). Returns the report name. 
description(). Static. 
main(). Static. 

Temporary Tables and the TableType Property [AX 2012]

The following table describes the TableType property.
Value
Description
Regular
The default value. These are permanent tables.
TemporaryInMemory
A temporary table that exists as an indexed sequential access method (ISAM) file. The ISAM file can exist on either the client tier of the Application Object Server (AOS) tier. The underlying Microsoft SQL Server has no connection to the ISAM file.
The system does allow you join an InMemory table in the X++ SQL syntax. However, joins and other set operations with InMemory tables are usually inefficient.
For more information, see Temporary InMemory Tables.
An InMemory table is the same thing as what was previously called a temporary table in Microsoft Dynamics AX 2009.
TemporaryTempDB
A temporary table that resides in the TempDB database of the underlying SQL Server. The nonstandard format of a TempDB table causes the table to be dropped when it is no longer in use by the current method.
Joins and other set operations on TempDB tables can be efficient.
For more information, see Temporary TempDB Tables.

Create Number Sequence In Ax 2012


Creating number seq:

 Hello Friends,
Today i want to describe about how to create number sequence in AX2012

It is same as like as we know in Ax2009 but small steps is added in AX2012.don't worry just follow the below steps simply we will get number sequence in AX2012.

We will Take a EDT name as "Car Id" and create in number sequence.For that first we should select a module for new number sequence for example project module.
                                   
steps:

1.  Create an edt : CarId .

     AOT >> Extended Data Types >> New  >> Properties >> Name  >> Car Id.

2. Write a code on lode module() on NumberSeqModuleProject

{
     datatype.parmDatatypeId(extendedTypeNum(Car Id));
     datatype.parmReferenceHelp(literalStr("@SYS334483"));
     datatype.parmWizardIsManual(NoYes::No);
     datatype.parmWizardIsChangeDownAllowed(NoYes::No);
     datatype.parmWizardIsChangeUpAllowed(NoYes::No);
     datatype.parmWizardHighest(999999);
     datatype.parmSortField(20);
     datatype.addParameterType(NumberSeqParameterType::DataArea, truefalse);
     this.create(datatype);
}

3.Write a method on Projparameters Table

     client server static NumberSequenceReference numRefcarId()
{
     return NumberSeqReference::findReference(extendedTypeNum(car Id));
}

4.Write a job and run that

static void Carid(Args _args)
{
    NumberSeqModuleProject  NumberSeqModuleProject = new NumberSeqModuleProject();
    ;
    NumberSeqModuleProject.load();
}


5. Then run the wizard

   Organization Administration >> CommonForms >> Numbersequences>>Numbersequences>> Generate >> run the wizard.

6.Now we have to check the number sequence  is correctly working  for that write a job:

static void number(Args _args)
{
    NumberSeq  numberSeq;
    CarId num;
    ;
    numberSeq = NumberSeq::newGetNum(ProjParameters::numRefcarId());
    num = numberSeq.num();
    info(num);
}

  Run the above job.We will find the generated Number     sequence.                                                    .

7. Now we want that Number Sequence in form level(Car Table):

Declare the number sequence On Form Declaration:
public class FormRun extends ObjectRun
{
    NumberSeqFormHandler numberSeqFormHandler;

}

 8. Write the NumberSeqFormHandler() in form methods node.

NumberSeqFormHandler numberSeqFormHandler()
{
    if (!numberSeqFormHandler)
    {
        numberSeqFormHandler = NumberSeqFormHandler::newForm(ProjParameters::numRefcarId      ().NumberSequenceId,
                                                             element,
                                                             CarTable_DS,
                                                             fieldNum(CarTable, Car Id)
                                                            );
    }
    return numberSeqFormHandler;
}


9.Write the close() on the form methods node.

void close()
{
    if (numberSeqFormHandler)
    {
        numberSeqFormHandler.formMethodClose();
    }
    super();
}

10. Then final add the below methods on data source methods node
Create()

void create(boolean append = false,
            boolean extern = false)  // If created externally
{
    element.numberSeqFormHandler().formMethodDataSourceCreatePre();

    super(append);

    if (!extern)
    {
        element.numberSeqFormHandler().formMethodDataSourceCreate(true);
    }
}

Delete()

public void delete()
{
    element.numberSeqFormHandler().formMethodDataSourceDelete();
    super();
}

Write()

public void write()
{
    super();
    element.numberSeqFormHandler().formMethodDataSourceWrite();
}

Validate Write()

public boolean validateWrite()
{
    boolean         ret;
    ret = super();
    ret = element.numberSeqFormHandler().formMethodDataSourceValidateWrite(ret) && ret;
    if (ret)
    {
        CarTable.validateWrite();
    }
    return ret;
}

Link Active()

public void linkActive()
{
    ;
    element.numberSeqFormHandler().formMethodDataSourceLinkActive();
    super();
}

 Now our numberseqence is generated .

*** Set the field or Tabpage Allowedit property to No.
***Check the continues on wizard.

Dynamics Ax Table collections & Virtual company

Dynamics Ax Table collections & Virtual company

If using more than one company, sometimes, it will be useful to share data from tables with general information, like, tables storing data like zip codes and country codes. The most basic way to share data from a table among all companies is to set the table propertySaveDataPerCompany to No. 
This will merge data for the table and make the data accessible from all companies. In practice, the kernel will delete the system field dataAreaId for the table.
Another way to sharing data without having to change any settings in the existing tables is by using Table Collections. A table collection is just a template for tables to be shared by any number of companies and Table collections shared using a virtual company.

The form SysDataAreaVirtual is used to define virtual companies. Virtual company is a term used for sharing table collections among a set of companies and does not exist in reality, and therefore, you cannot switch to a virtual company like any normal company.

When using TC for setup tables (like customer groups), setting up a VC will be easy. But, if you are going to share data from main tables (like the inventory table), you should do more investigation as you cannot only share the table InventTable. You must include all tables which are related to InventTable.

Note: Before creating a VC you should export data for the tables used in the table collection, as existing data will be deleted from these tables when added to a virtual company.
 
Virtual Company setup:

Step 1: Create Table Collection:
Decide which tables you want to share and create a Table collection for these functionally related tables. For example; if you want to share 'Global Address Book' across companies then you can utilize the existing table collection "DirPartyCollection".

To create a table collection, go to AOT\Data Dictionary\Table Collections and on right click select "New Table Collection", then just drag your required tables in this collection.

Step 2: Create Virtual Company, configure/attach normal companies and table collection:
Create a virtual company that will hold the shared data for normal companies.
Note: Before doing the below steps, make sure you are the Ax administrator and the only user online.
1.       Go to Administration > Setup > Virtual company accounts, and create a virtual company.

2.      Decide which companies needs to share data and attach those normal companies with this virtual company.

3.      Attach the table collection with this virtual company and save form.

Your Ax client will re-start and you are done with setting up the virtual company account.

Now, when you have virtual company in place, all new data will be saved in this virtual company. Only companies attached to the virtual company can use this shared data. All other companies which are not attached will work normally, these companies will continue to read/write data as per company bases.

How to move existing data to virtual company?When you setup a new virtual company, Ax does not move data automatically from normal company to virtual company. This is done by system administrator manually.

There are many ways to do this data move, let’s see only two such approaches here.
Approach 1: Ax Import / Export
This is standard Ax approach.
  1. Manually export existing normal company data from Ax.
  2. Remove duplicate records from this exported data set.
  3. Delete exported data from normal companies.
  4. Import the exported data back in Ax, while logged into one of the participating companies.
  5. Create records deleted in point 2 again in Ax using your logic. How you want to handle duplicate? For example, if you have customer 'Customer' in more than one normal company, what you want to do with this?
Approach 2: Direct SQL
Use this approach if you have good knowledge about SQL queries and Ax table structures/relationships. Below are steps you can follow.
  1.  All Ax tables store data as per company unless otherwise specified. For this, Ax uses a special field called DataAreaId. In case of virtual company, it does not matter from which normal company you log-in, it is always the virtual company id which is stored in DataAreaId field of shared tables.
  2.  Ax also assigns a unique 64bit number to each record in table. For this, Ax uses a special field called RecId. This RecId is unique in the table and is generated by Ax when you insert a new record in Ax. It is not related to DataAreaId / Company.
  3. For unique records between all participating normal companies, update the DataAreaId to the virtual company id.
For duplicate records, create them again in Ax using some Ax job or Ax import/export technique.

Monday, 20 January 2014

Document management in AX 2012

Document management in AX 2012

In Dynamics Ax 2012, you can attach documents to specific records. This can be done by clicking the “Attachments” button on the Ribbon for many forms. Below is a screen capture for Workers form:
 post42_AttachmentsButton
The picture isn’t clear, this is just to give an idea where you should possibly look for Attaments button.
But before you go ahead with Document attachments, you need to setup few things listed below:
  1. Activate Document management
  2. Set up Archive Directory – place to store the documents
  3. Create required Document types
  4. Use Document management to attach files to records in any Dynamics Ax Form.
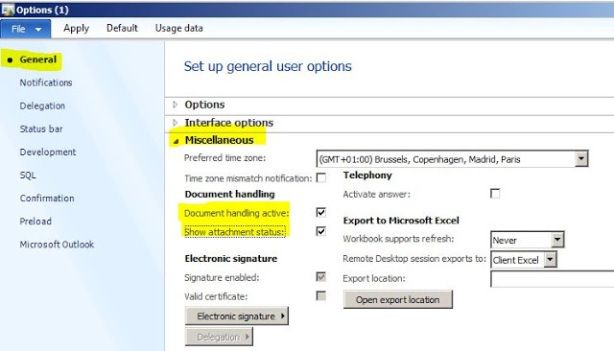
Activate Document Management: 
Complete the following procedure to activate document management.
  1. Click File > Tools > Options.
  2. Click General and then expand the Miscellaneous FastTab.
  3. Select the Document handling active check box.
  4. Select Show attachment status to highlight the Document handling control on the status bar
    and Select Action Pane when you select a record that has documents references.
post43_toolsform

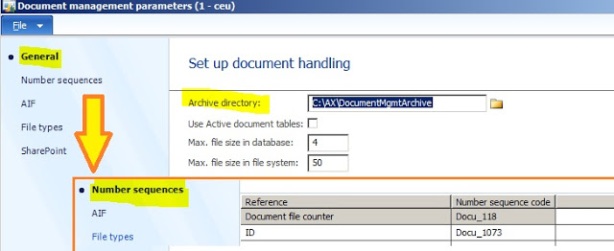
Set up document Archive Directory:
Complete the following procedure to set default document archive directory.
  1. Click Organization administration > Setup > Document management > Document management parameters.
  2. In the General area of the form, in the Archive directory field, enter the path to the archive directory.
  3. Click Number sequences, and select the ID reference.
  4. In the Number sequence code field, select the number sequence code to use for naming your documents.
 post43_DocuParameters
Note: You can select an alternative archive directory for each document type in theDocument types form. If you change the archive for your documents, existing document references will not work unless you have already copied all existing documents to the new archive.
Create required Document types: 
The document can be attached if and only if the file is of any type that is set up in the Document types form.
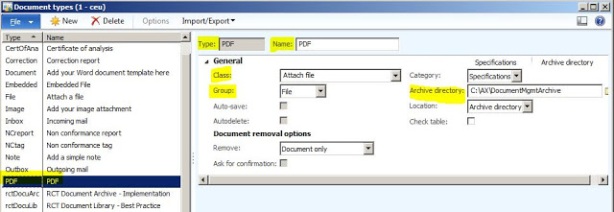
Follow the below steps to create a new document type:
  1. Click Organization administration > Setup > Document management > Document types.
  2. Press CTRL+N to create a new document type.
    or you can click the “New” button.
  3. In the Type field, enter a code for the document type.
    This Type field is shown while adding documents to records, so recommended to have a descriptive name here.
  4. In the Name field, type a descriptive name for the document type.
    More description if needed.
  5. In the Class field, select the type of document to create.
    To specify which class do you want the new document type to fall in.
  6. In the Group field, select a group for the document type.
    Choose among the pre-defined groups avaliable.
  7. Close the form to save your changes.
post43_NewDocType
Using Document management:
You can actually perform any of the below actions:
  1. Create a new document
  2. Create a Copy of an existing document
  3. Copy to clipboard to copy the document elsewhere in the System
Below are examples of how to do it, and are performed on Prospect details form (Sales and marketing module)
Create a document
  1. Click Sales and marketing > Common > Prospects > All prospects.
  2. Select the prospect record that you want to create an attachment for or attach a document to.
  3. Click Attachments to open the form.
  4. Press CTRL+N to create a new document.
  5. Select the document type in the Documents form and then click OK.
Note: The document icon in the Prospects form changes from an empty sheet of paper to a book. This indicates that there are documents attached to the prospect record.
You can create documents for other users by selecting their user names from the list in the Author field. You can also transfer a document to another author in the Author field.
Copy a document
  1. Click Sales and marketing > Common > Prospects > All prospects.
  2. In the Prospects form, select the prospect record from which you want to copy a document.
  3. Click Attachments to open the Documents form.
Verify that the document attached is a type that can be opened, such as a Microsoft Word file type or a Microsoft Excel worksheet.
  1. Click Copy.
  2. In the Description field, update the description of the newly copied document.
Copy a document to the Clipboard
  1. Click Sales and marketing > Common > Prospects > All prospects.
  2. In the Prospects form, select the prospect record that has the document that you want to copy to the clip board.
  3. Click Attachments to open the Documents form.
  4. Click Copy to clipboard.
The active document is now copied to the Clipboard and can be pasted into any file that accepts text (such as email or a document).
  1. Press CTRL+V to paste the copied document into the destination.
Note: The copy-and-paste procedure creates a copy of the selected document in the file system but does not maintain any connection to the document management system of Microsoft Dynamics AX. No new document identification is created, nor is the copied document attached to any record.